Getting started with time tracking
How time tracking works in Ontraccr
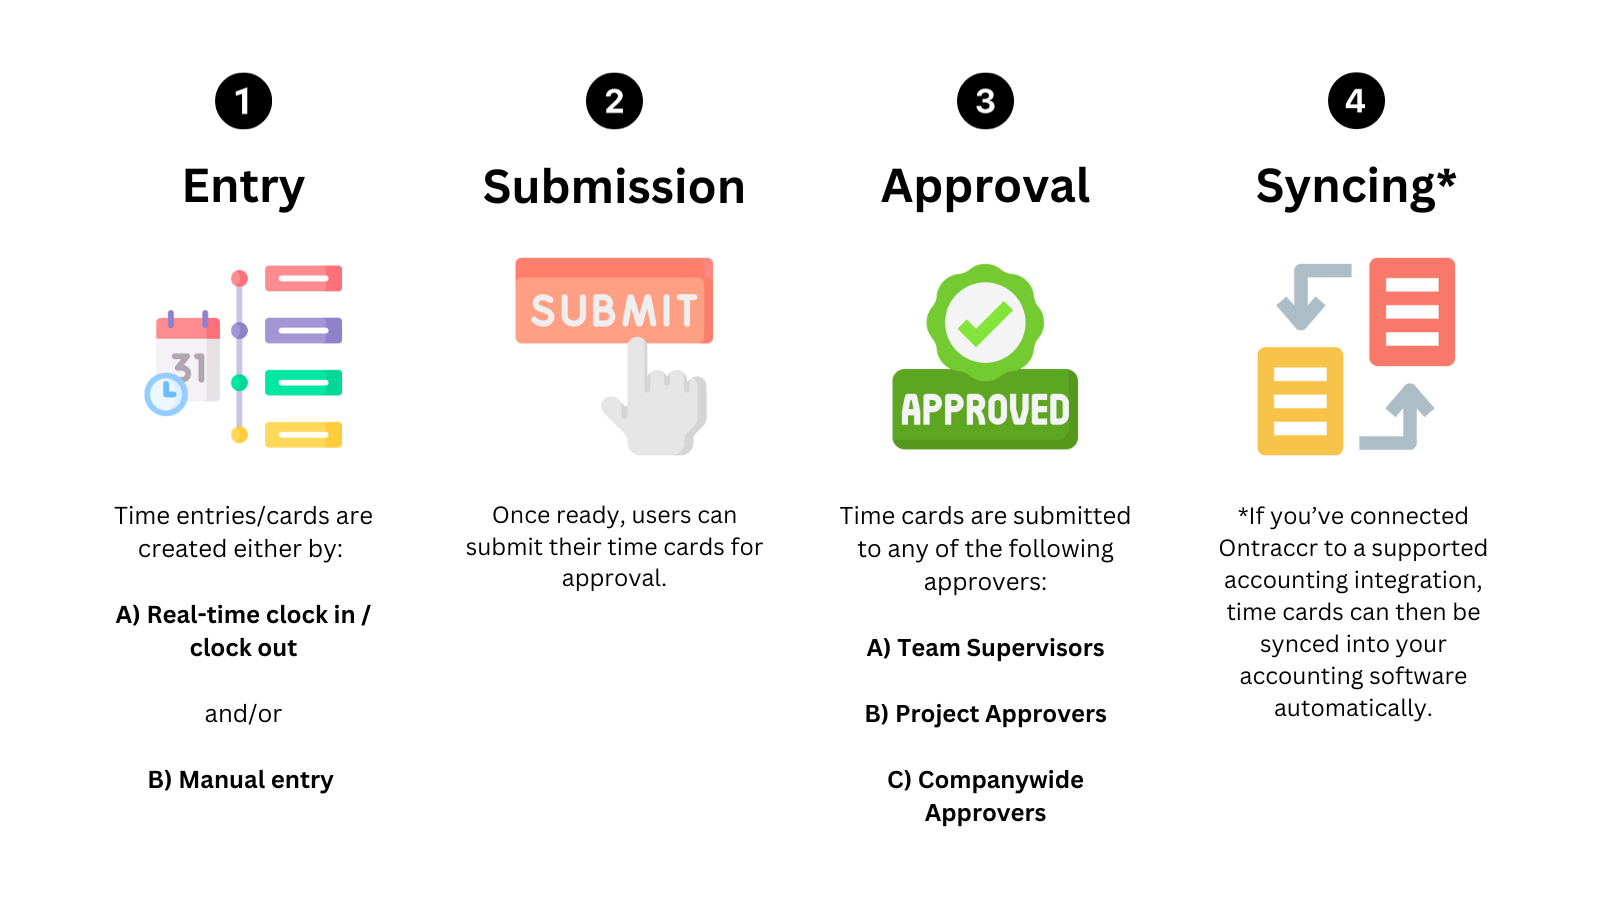
Time tracking in Ontraccr consists of four main parts (in order):
Please note:
- Submission (2) and approval (3) steps are essentially optional, this really just comes down to whether you want your team to submit and approve time cards in Ontraccr. Otherwise, you can also get by with only time card entry (1).
- Payroll syncing (4) is only relevant to your time tracking process if you've integrated a supported accounting tool with Ontraccr. If you have an active integration, once time cards are fully approved, they can sync into your accounting software automatically. For more information on Ontraccr's supported integrations, please visit the Integrations section of the Learning Center.
Setting up your time card entry process
There are many different ways you can allow your users to track their time. At a basic level, every time card in Ontraccr consists of the following fields of information:
- Date
- Hours or Start Time / End Time
- Type (work, break, overtime)
- Project
- Phase
- Cost Code
- Notes
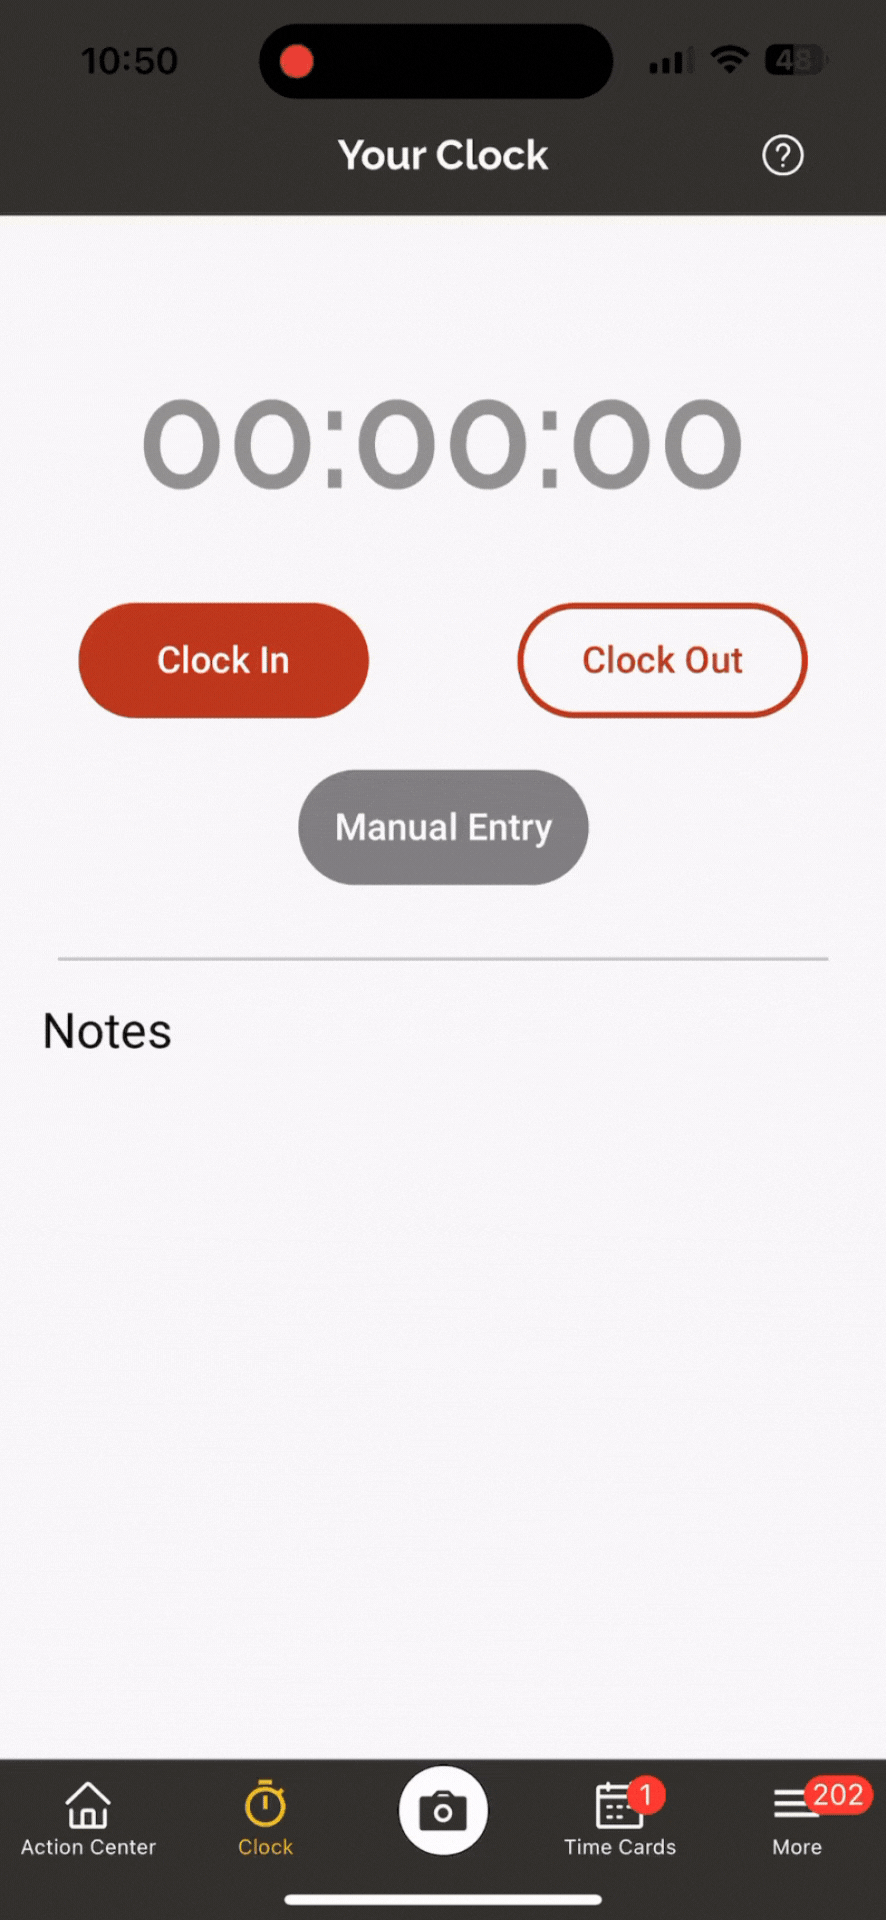
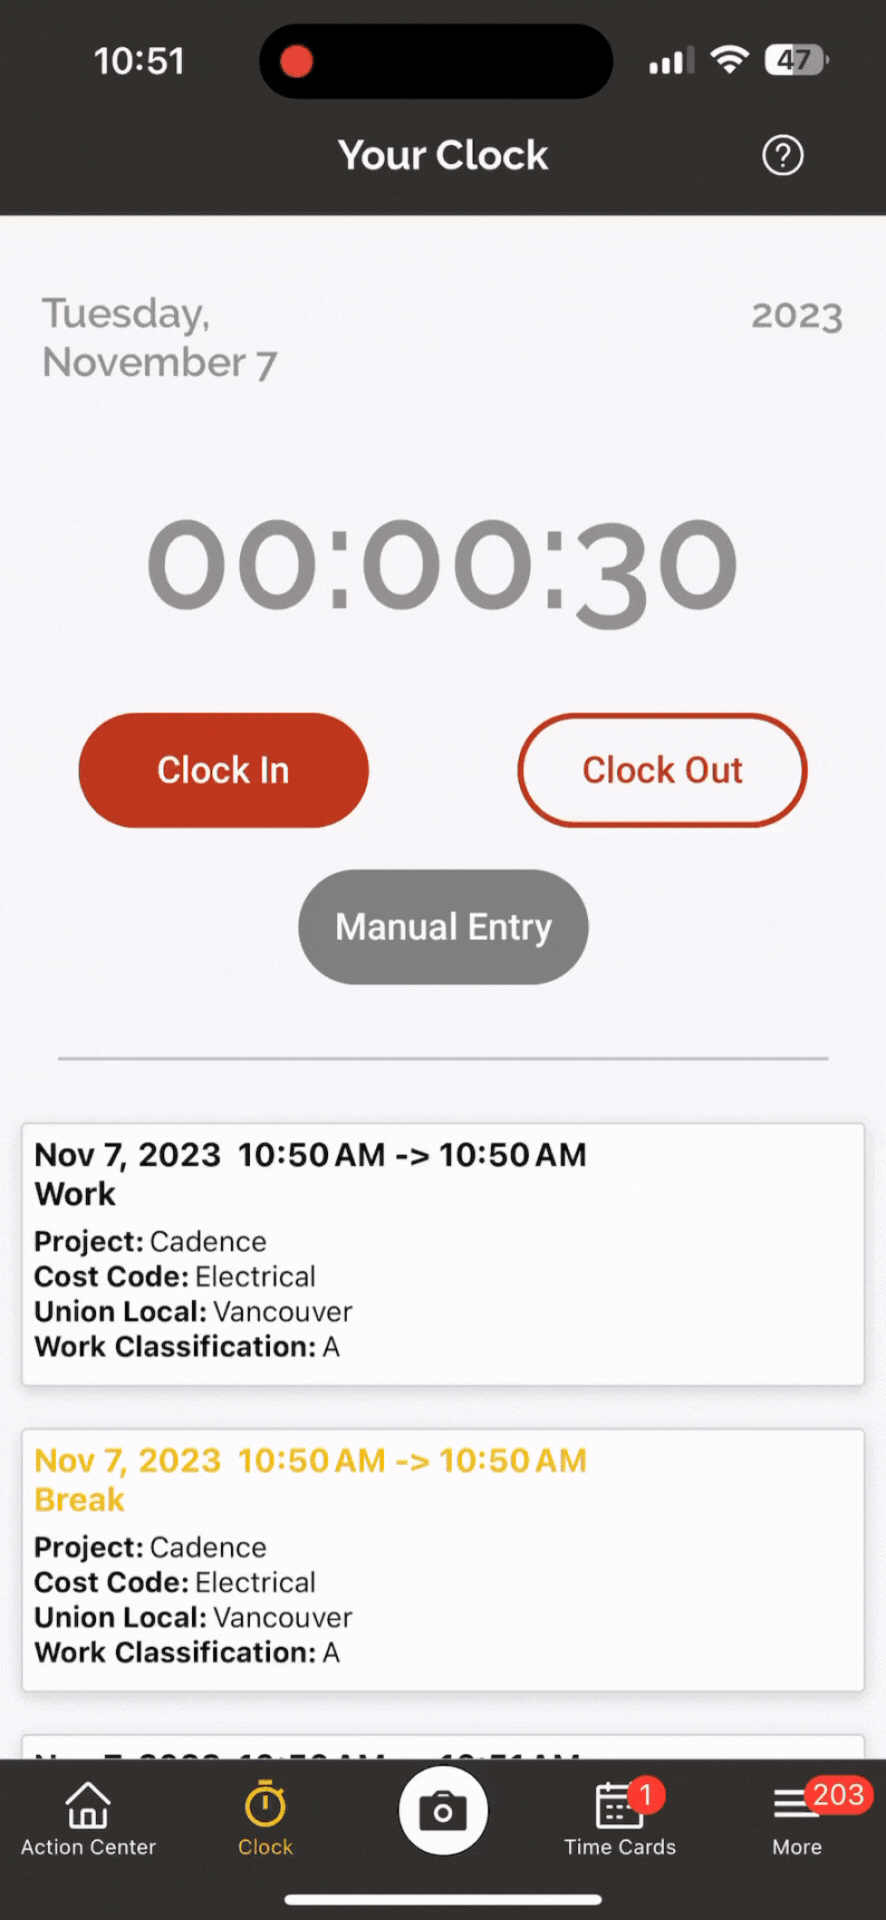
Time cards can be entered either by real-time clock in / out or by manual entry:
When it comes to entering information into time cards, you can customize your team's experience to make sure it suits your time tracking needs.
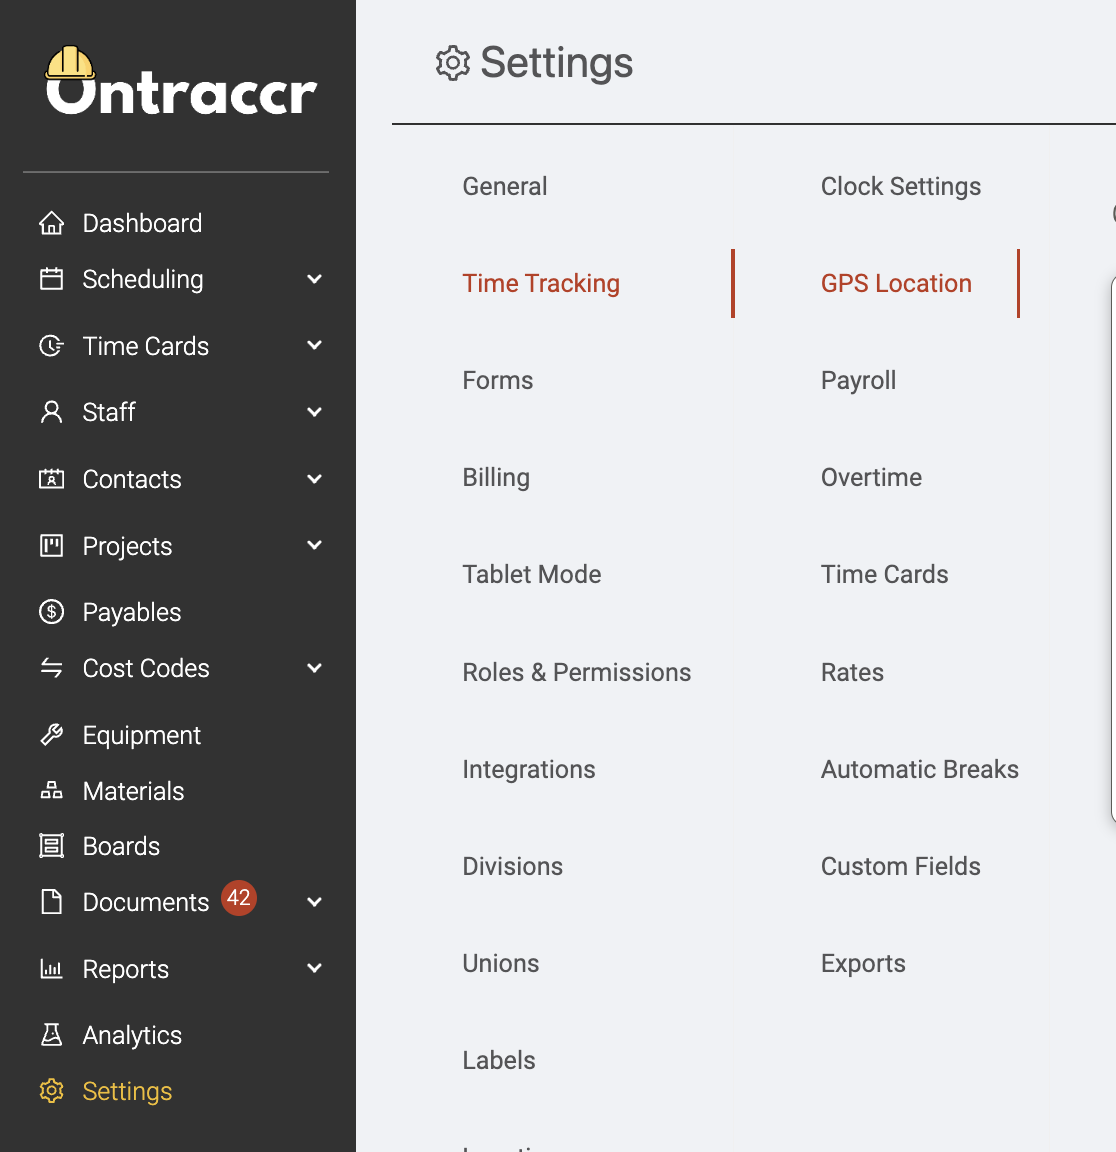
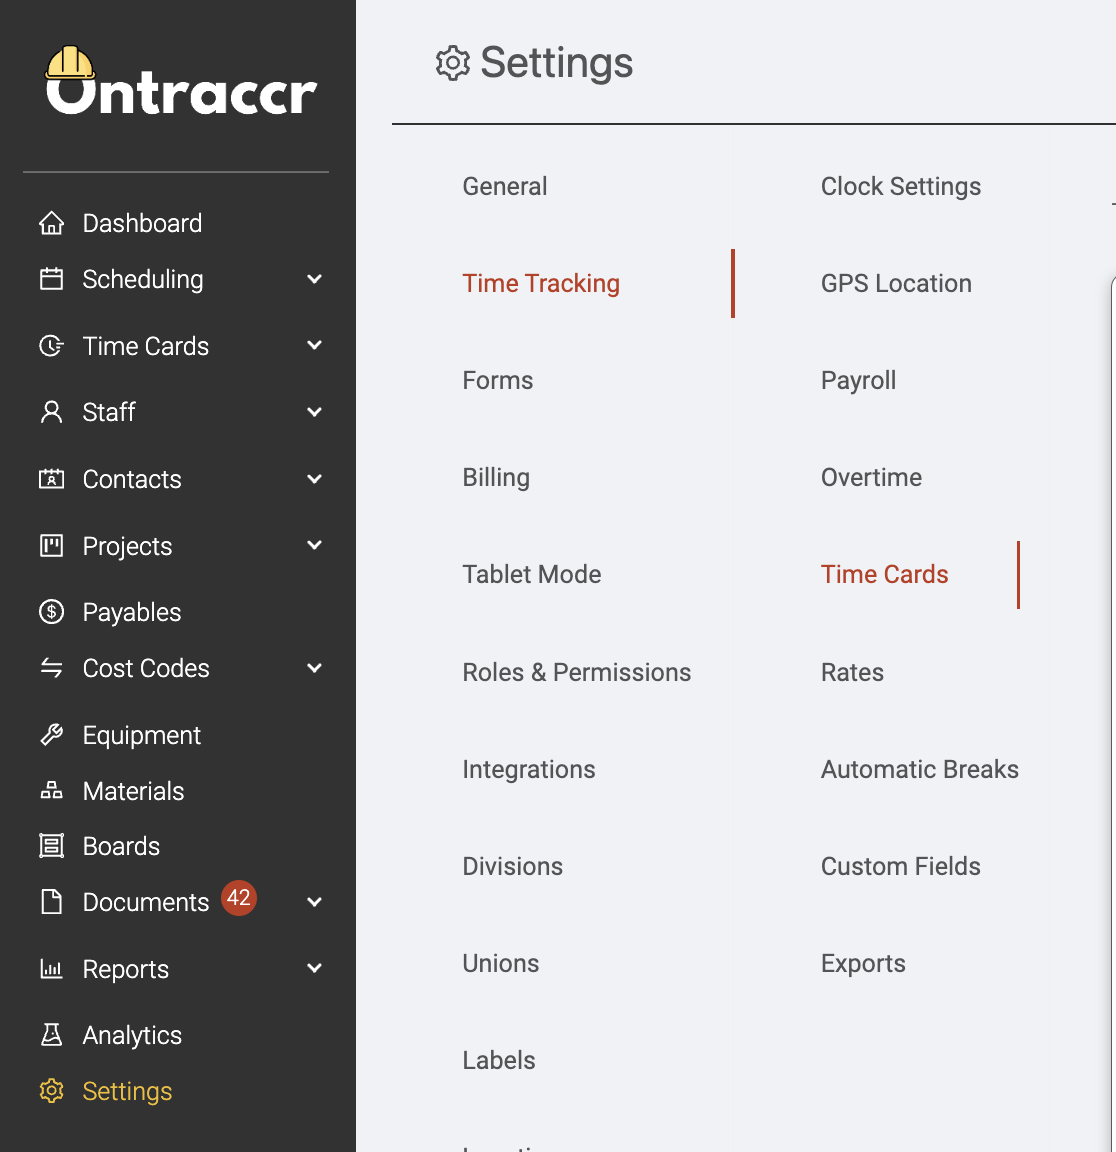
The Settings > Time Tracking > Clock Settings page will show you a number of foundational time tracking options.
The 'Require Job Selection' and 'Require Cost Code Selection' settings dictate whether you require your users to select a job/project and/or cost code for their time entries. Disabling these two settings will still show job/project and cost codes selection options for the time entry, but these will be optional for the user as opposed to required in order for them to save the time entry.

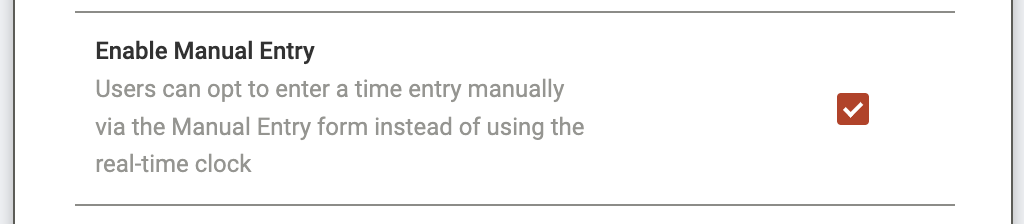
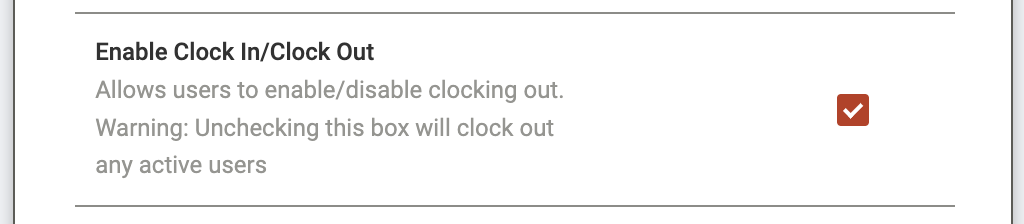
By default, Ontraccr's time tracking system allows users to track their time in real-time by clocking in and out of their shift in order to track their time, this ensures accuracy in the data as you will know exactly when each user starts and ends their shift, as well as exactly how much time they spend on each cost code. However, if you don't want to force your users to only track time by clocking in and clocking out, you can still give them the option to enter their time manually. The 'Enable Manual Entry' setting will enable/disable the option to add manual entries, whereas the 'Enable Clock In/Clock Out' setting can enable/disable the ability to clock in and clock out.
By default, Ontraccr allows user to track time by their start and end time to ensure data accuracy. However, if you want to give your users the option to track their time by simply entering the number of hours instead, you can activate this by enabling the 'Hour Based Time Tracking' setting.

Ontraccr also has a Facial Capture feature, which will ask users to take a photo of themselves when tracking their time to verify their identity. To activate this feature, simply enable the 'Enable Facial Capture' settings.
Please note that Facial Capture only works for clocking in and clocking out and not for manual entries.

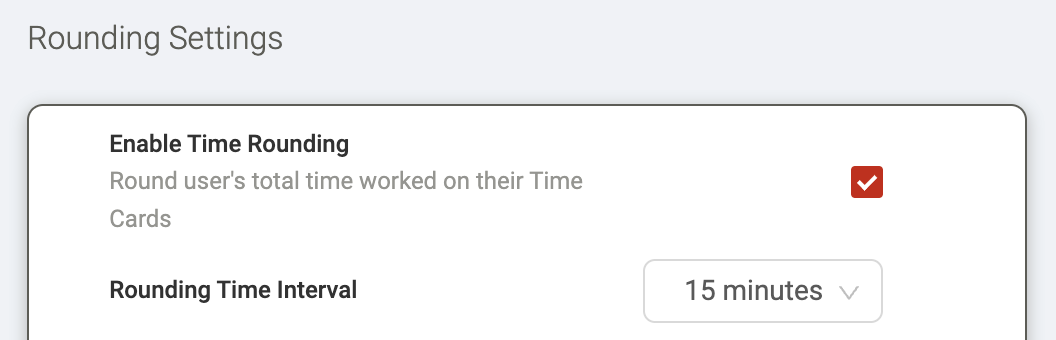
Ontraccr also supports the option of time rounding, which will round time entries according to your preference/policy. To activate time rounding across your company's time entries, navigate to the Settings > Time Tracking > Rounding page.
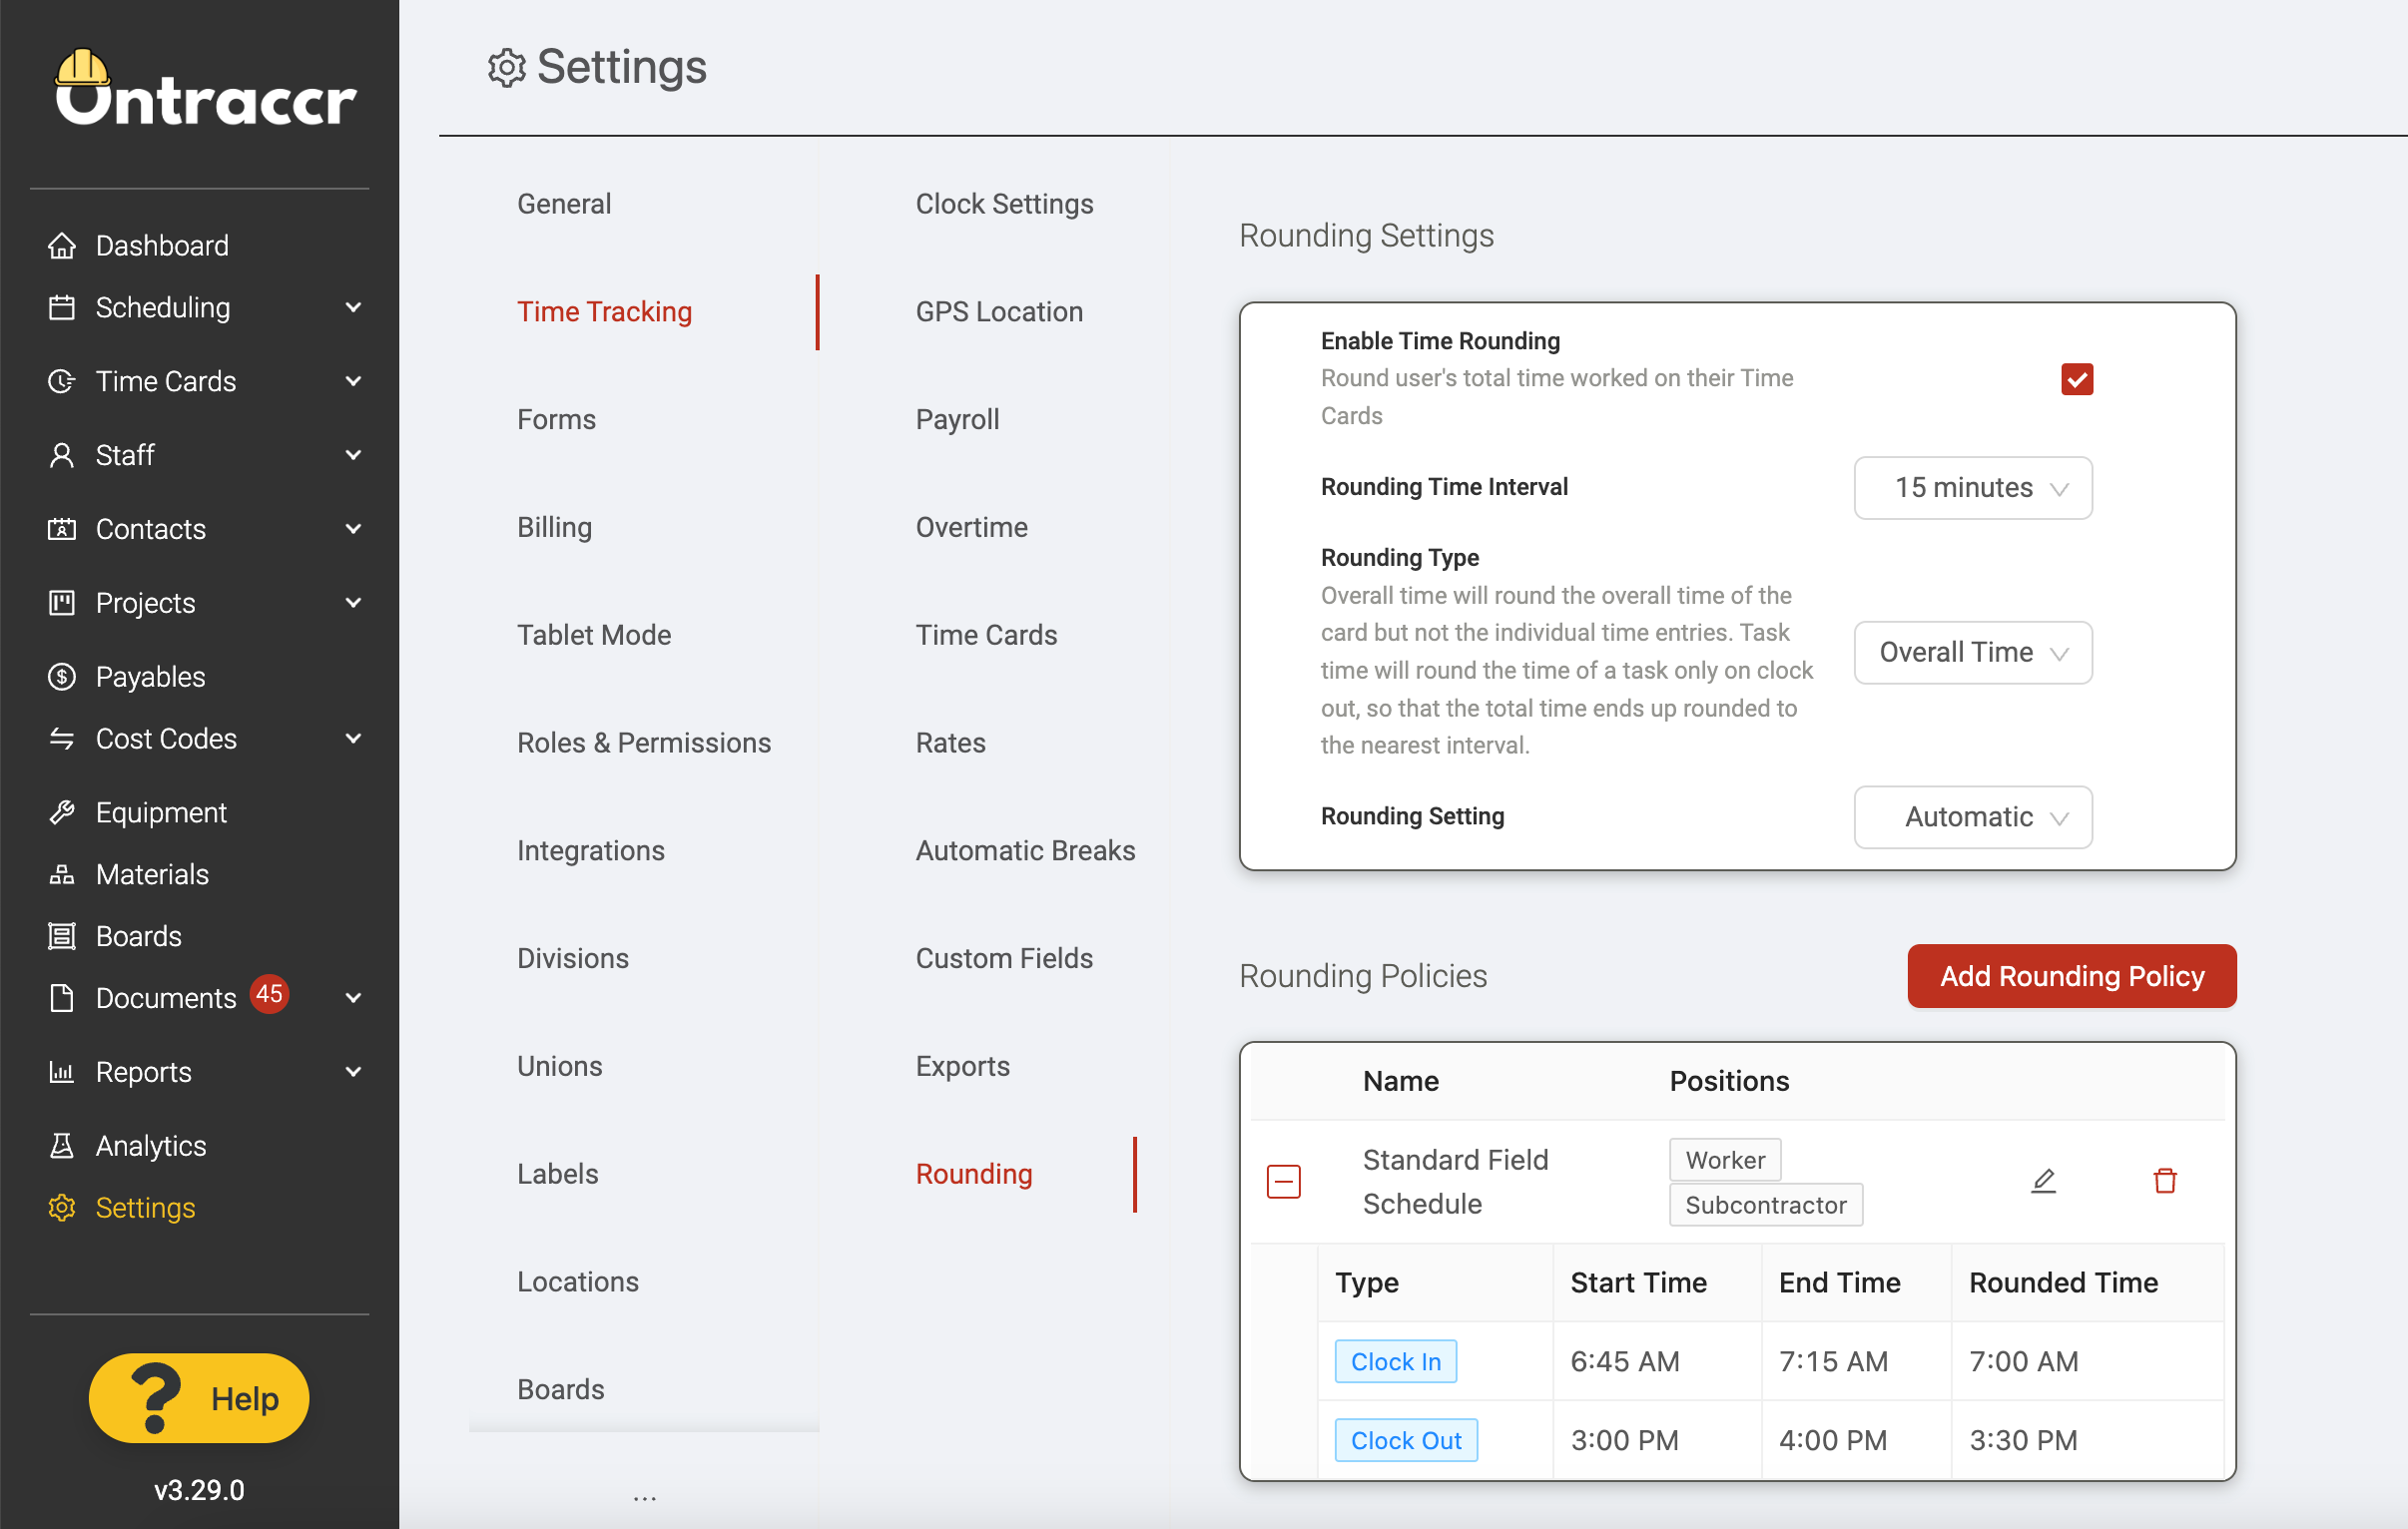
To activate time rounding, simply enable the 'Enable Time Rounding' and select your 'Rounding Time Interval' of 5, 10, 15, 30, or 60 minutes.
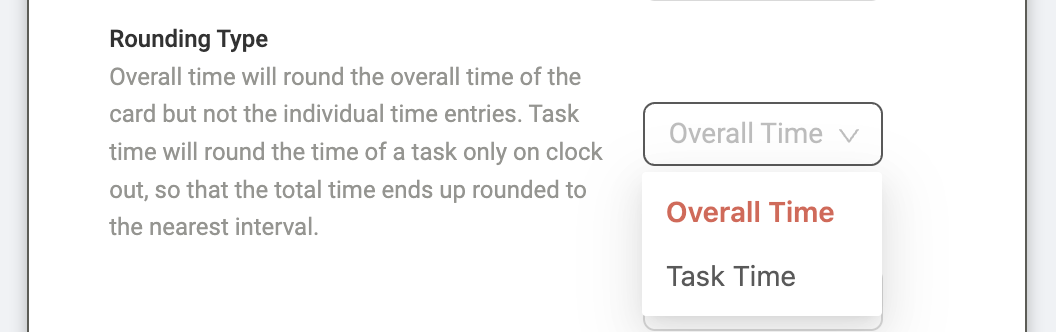
Next, there are various options and sub-settings available to decide exactly how you'd like to implement time rounding processes for your team in Ontraccr.
The 'Rounding Type' sub-setting dictates which part of a time card should be rounded. For example, if a daily time card has multiple entries which are summed up into an overall time for the time card across the day, you can decide whether you want to round the overall time of the daily time card or the individual task-based time entries themselves. To round the overall time of the daily time card, select the 'Overall Time' option. To round the individual time entries within the time card, select the 'Task Time' option.
Using geofencing and location data
Ontraccr can combine GPS location and time tracking data to form a complete picture of field activity. We know how sensitive the topic of GPS tracking can be with employees, which is why we offer multiple options to make it flexible and address employee concerns.
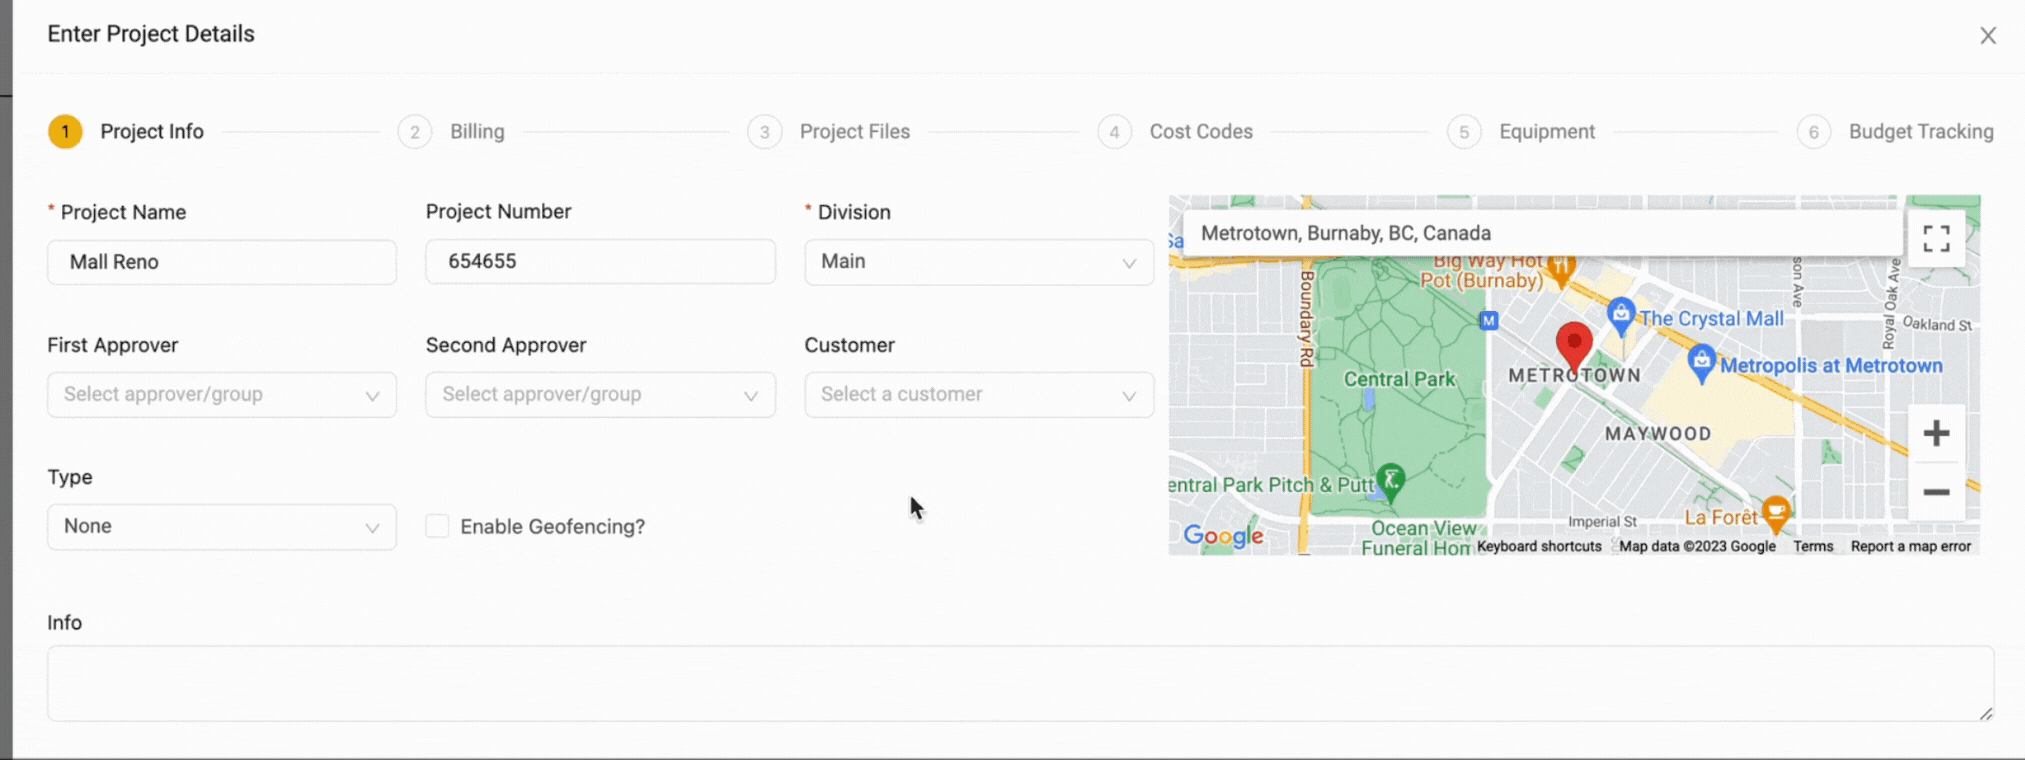
Time tracking in Ontraccr can make use of 'geofences'. A geofence is virtual geographic boundary, defined by GPS technology, that enables software to trigger a response when a mobile device enters or leaves a particular area. So when you think of your job sites, you can create a geofence around the job site area and this will restrict or limit your users from tracking time outside of the job site area. Each project can have it's own geofence.
Geofences can be created within the project profile as shown below.
The Settings > Time Tracking > GPS Location page is where you can configure your company's preferences and policies around how you'd like to implement or use GPS location data.
There are two mode of geofences in Ontraccr and you can pick between one of these two options:
1. Active Geofencing
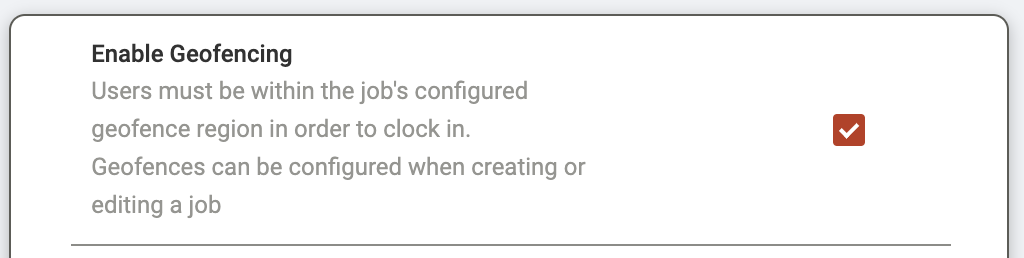
An active geofence will allow users to clock in to their shift only when they are within the geofence area. It will simply not allow them to clock in if they haven't reached the job site yet. If you'd like to use active geofences in your company, simply enable the 'Enable Geofencing' setting.
2. Passive Geofencing
A passive geofence will still allow users to clock in outside of the geofence area, but will still flag the time card to let managers/admins know that the user was outside of the geofence area when they clocked in. If you'd like to use passive geofences in your company, simply enable the 'Enable Passive Geofencing' setting.
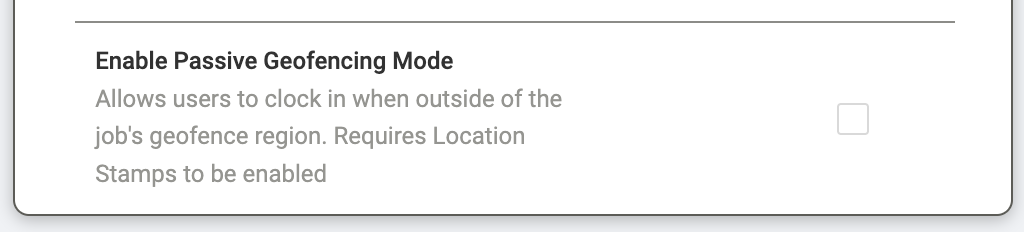
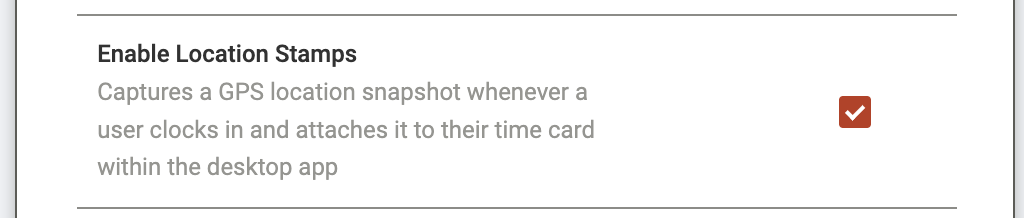
Alternatively, if you don't want to use geofencing, there's another location-based feature called 'Location Stamps', where Ontraccr will just take simple GPS snapshots of each location where the user clocks in or out and add it to the time card. Managers can always view the location stamps on each time card. To activate location stamps, enable the 'Enable Location Stamps' setting. Please note that location stamps will also need to be enabled in order to use passive geofencing.
Configuring time card submission preferences
When it comes to time card submissions, you can also configure additional settings within the Settings > Time Tracking > Time Cards page.
If you'd like your users to add their signatures to all of their time card submissions, simply enable the 'Enable Digital Signature' setting. With this enabled, as soon as users hit the submit button on their time cards, they will be prompted to add their e-signature in the mobile app.

By default, Ontraccr will let users submit their time cards whenever they want. However, if you want to lock this down to only allow users to submit time cards during the current pay period, you can enable the 'Lock Pay Period Submissions' setting.

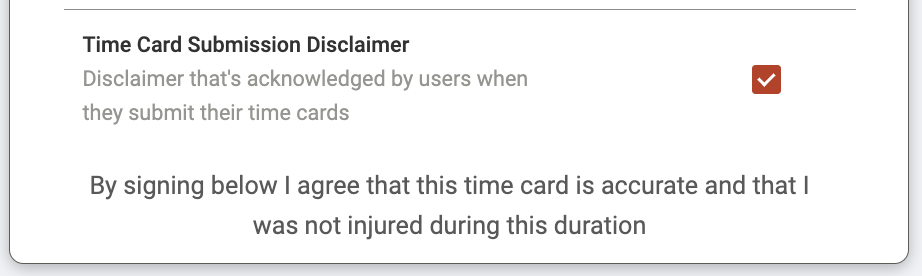
You can also add a custom disclaimer to time card submissions, which will be visible to the user every time they submit a time card, indicating that they have acknowledged the company disclaimer. To show a disclaimer on your company's time card submissions, simply enable the 'Time Card Submission Disclaimer' setting and type in your custom disclaimer text in the text box.
How to set up time card approvals
When it comes to setting up time card approvals, there are three options for approvals in Ontraccr. Time card submissions can either be approved by:
- Project Approver(s)
- Team Supervisor(s)
- Companywide Approver(s)
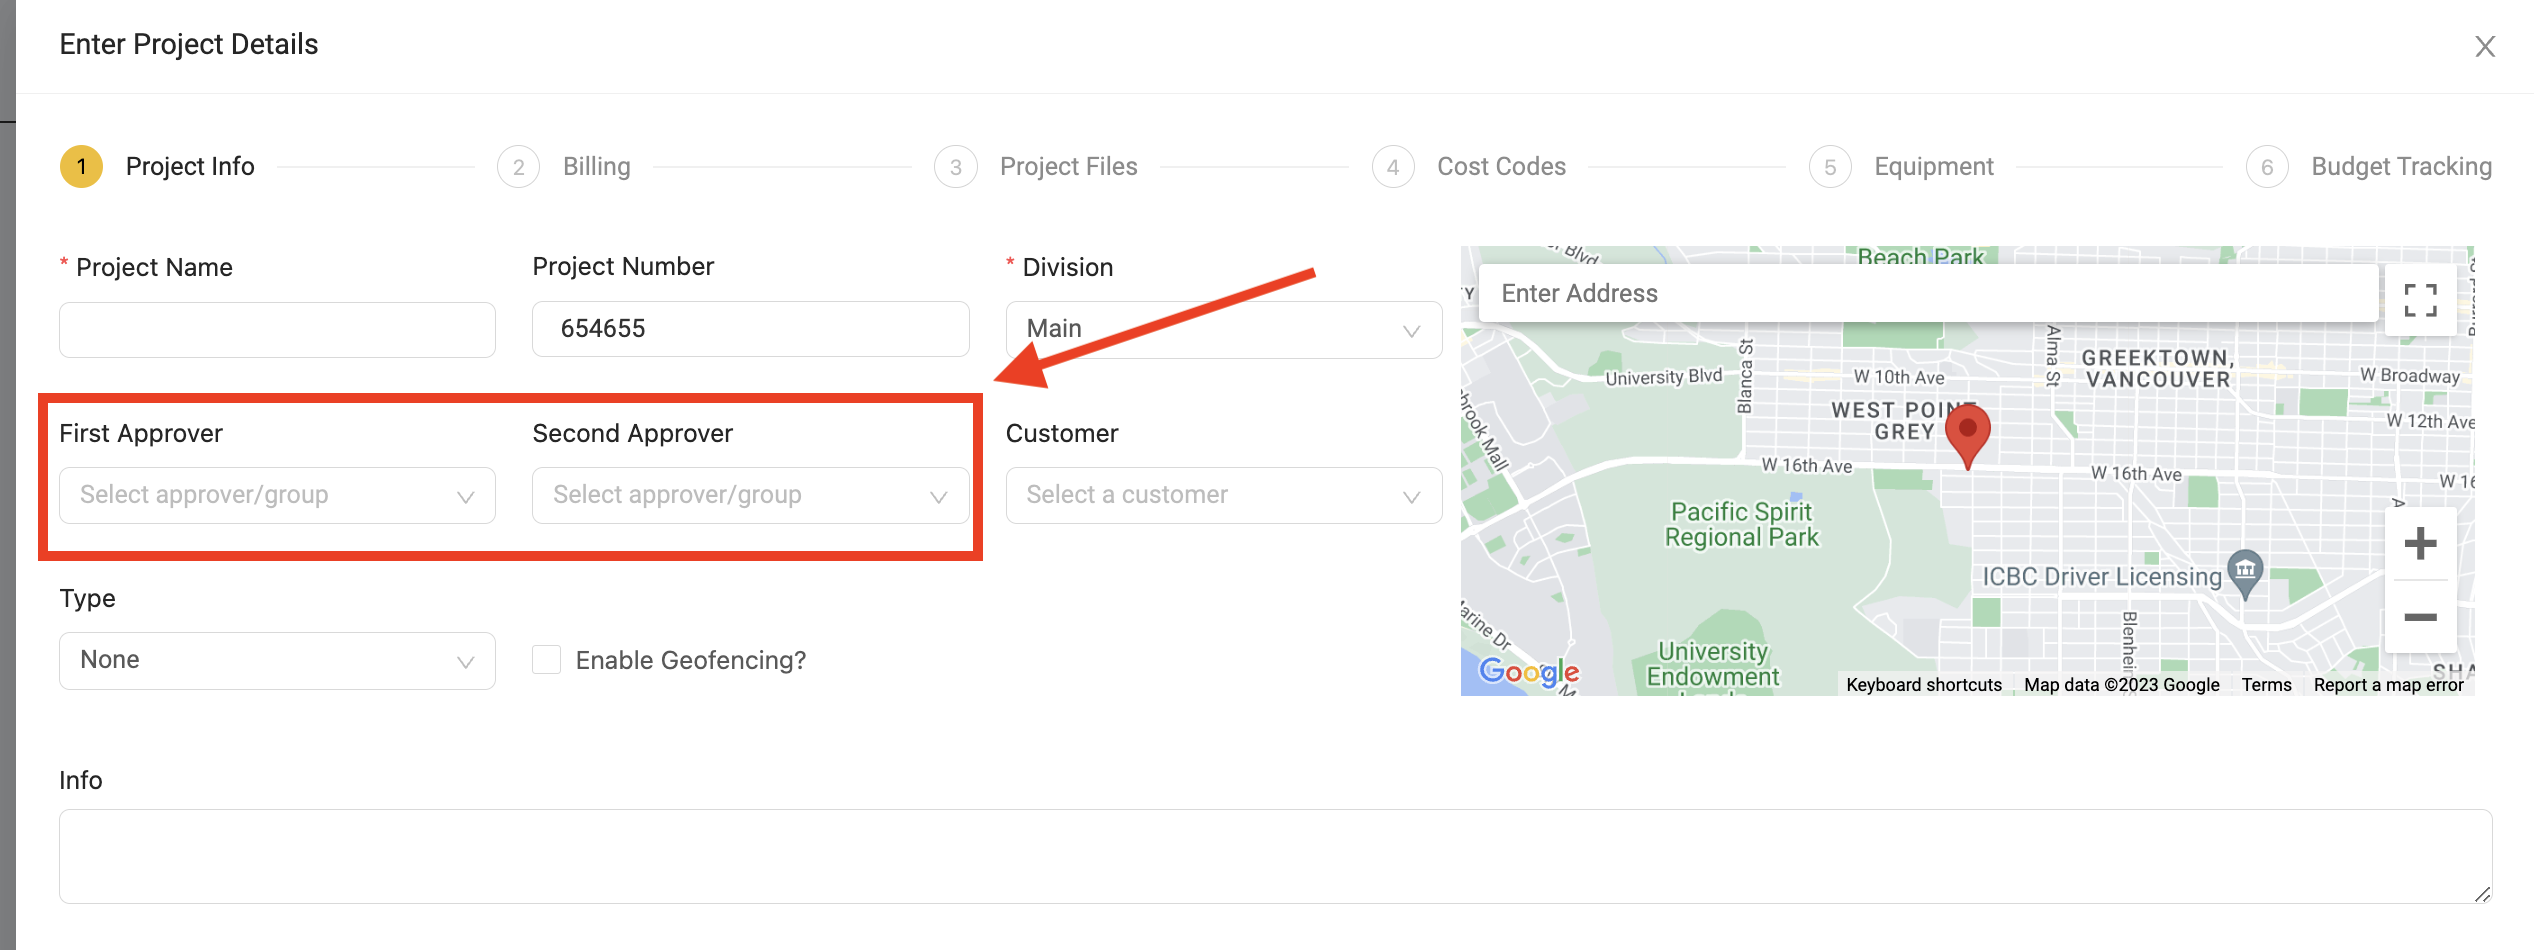
Project approvers can be set up within each project's profile itself. Within the project profile's 'Project Info' section, the 'First Approver' and 'Second Approver' fields let you assign up to two layers of approval for any time cards submitted for this project.
If you'd like user time card submissions to be approved by each user's corresponding team supervisor, you must first start by grouping your users into teams accordingly. Next, head to your Settings > Time Tracking > Time Cards page to enable the 'Enable Assigned Supervisor Approval' setting.

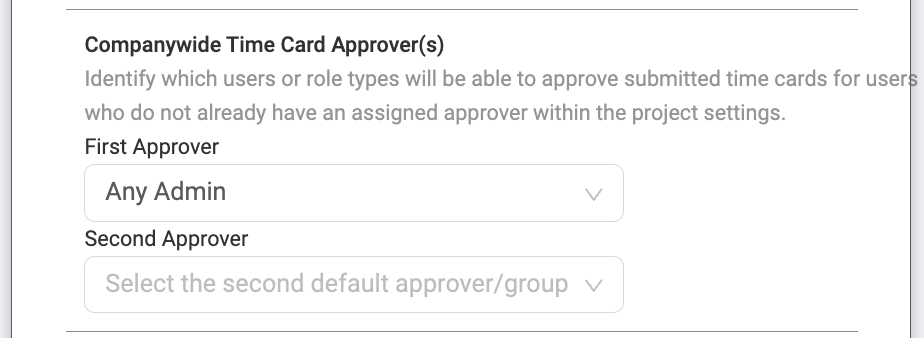
Lastly, you should set companywide approvers for any time card submissions that don't get sent to project approvers or team supervisors for approval. In this case, the time card submissions will be sent to the companywide approvers in this case. To configure your companywide approvers, head to the Settings > Time Tracking > Time Cards page and configure up to two layers of companywide approvers here.
Time card submissions in Ontraccr will always pursue the following approval chain upon submission:
1. Submissions will go to Project Approver(s). If none exist, then
2. Submissions will go to Team Supervisor(s). If none exist, then
3. Submissions will go to Companywide Approver(s).
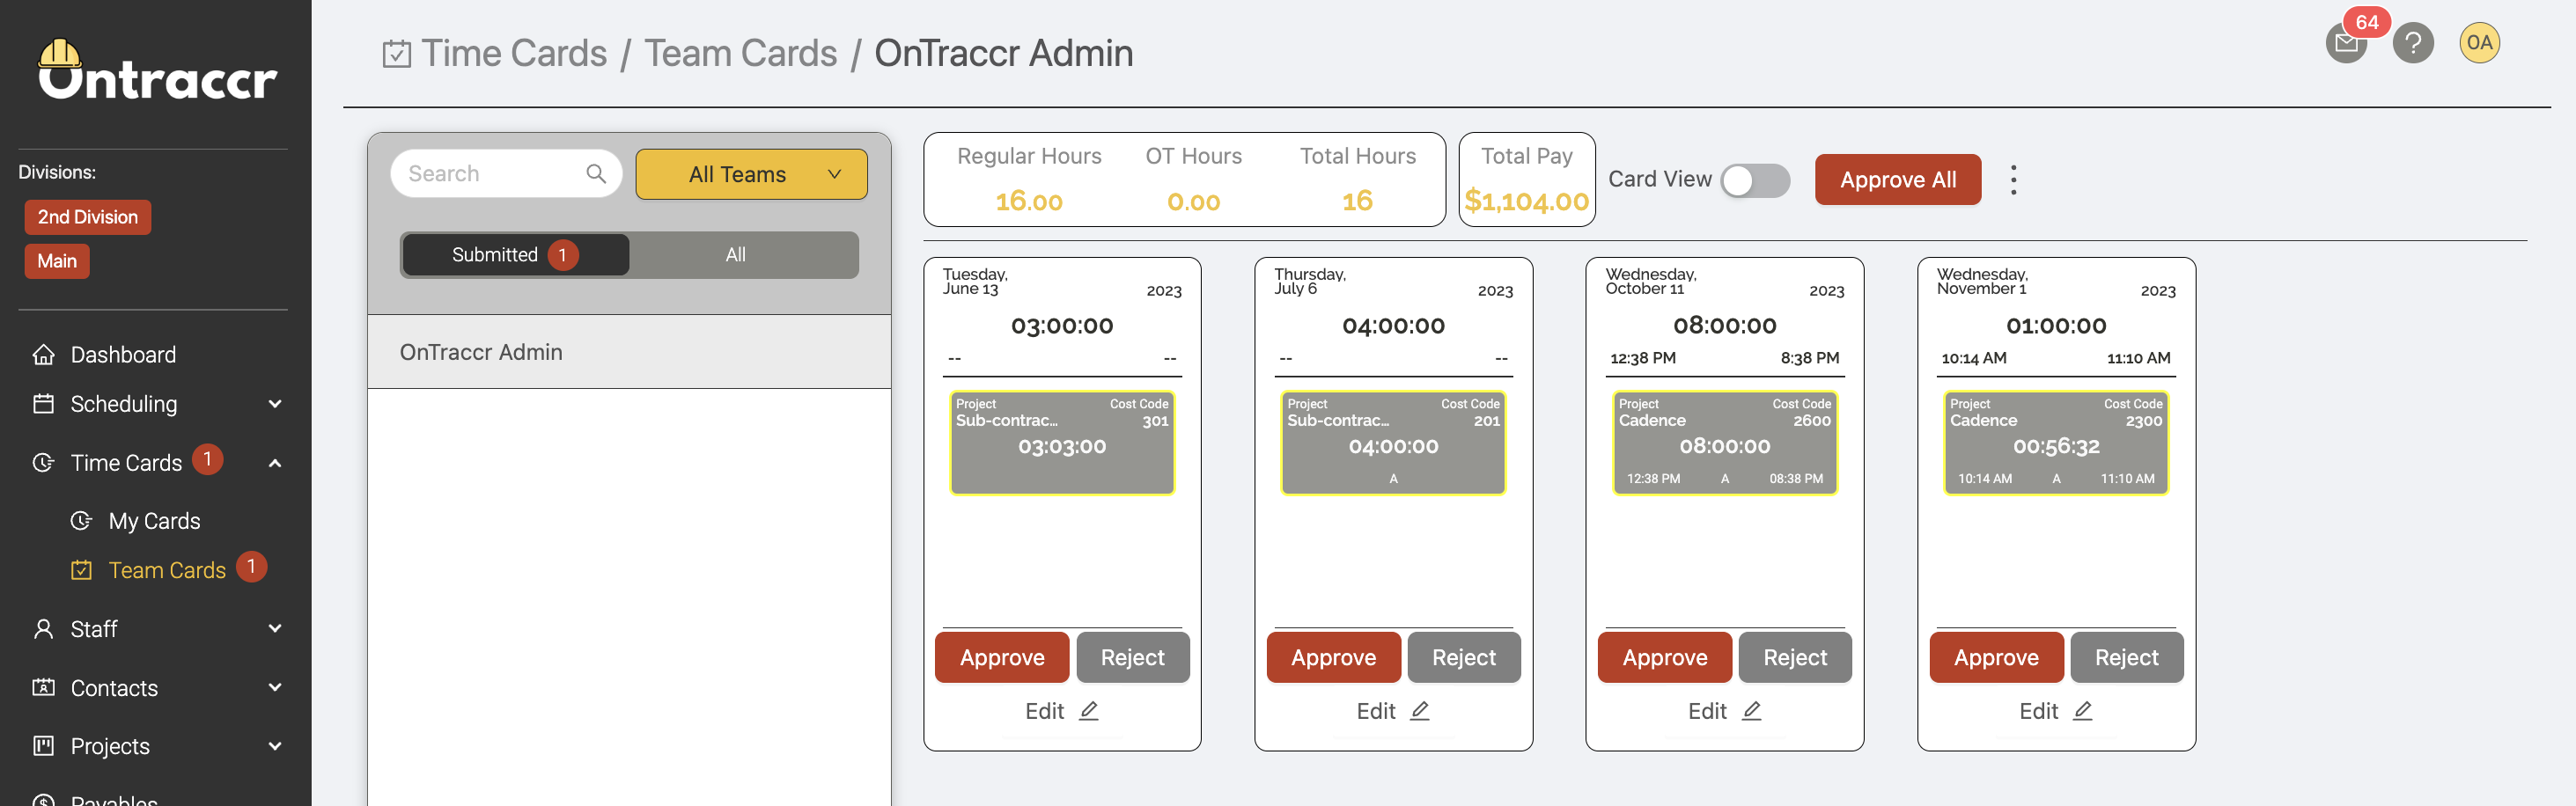
Time card approvers can always view and approve time card submissions from either the 'Submitted' section of the Time Cards > Team Cards page in the web app or in the Time Cards > Team Cards page in the mobile app.

Please note that time card approver users must have the 'Manage Teams' role permission enabled in order to approve time card.
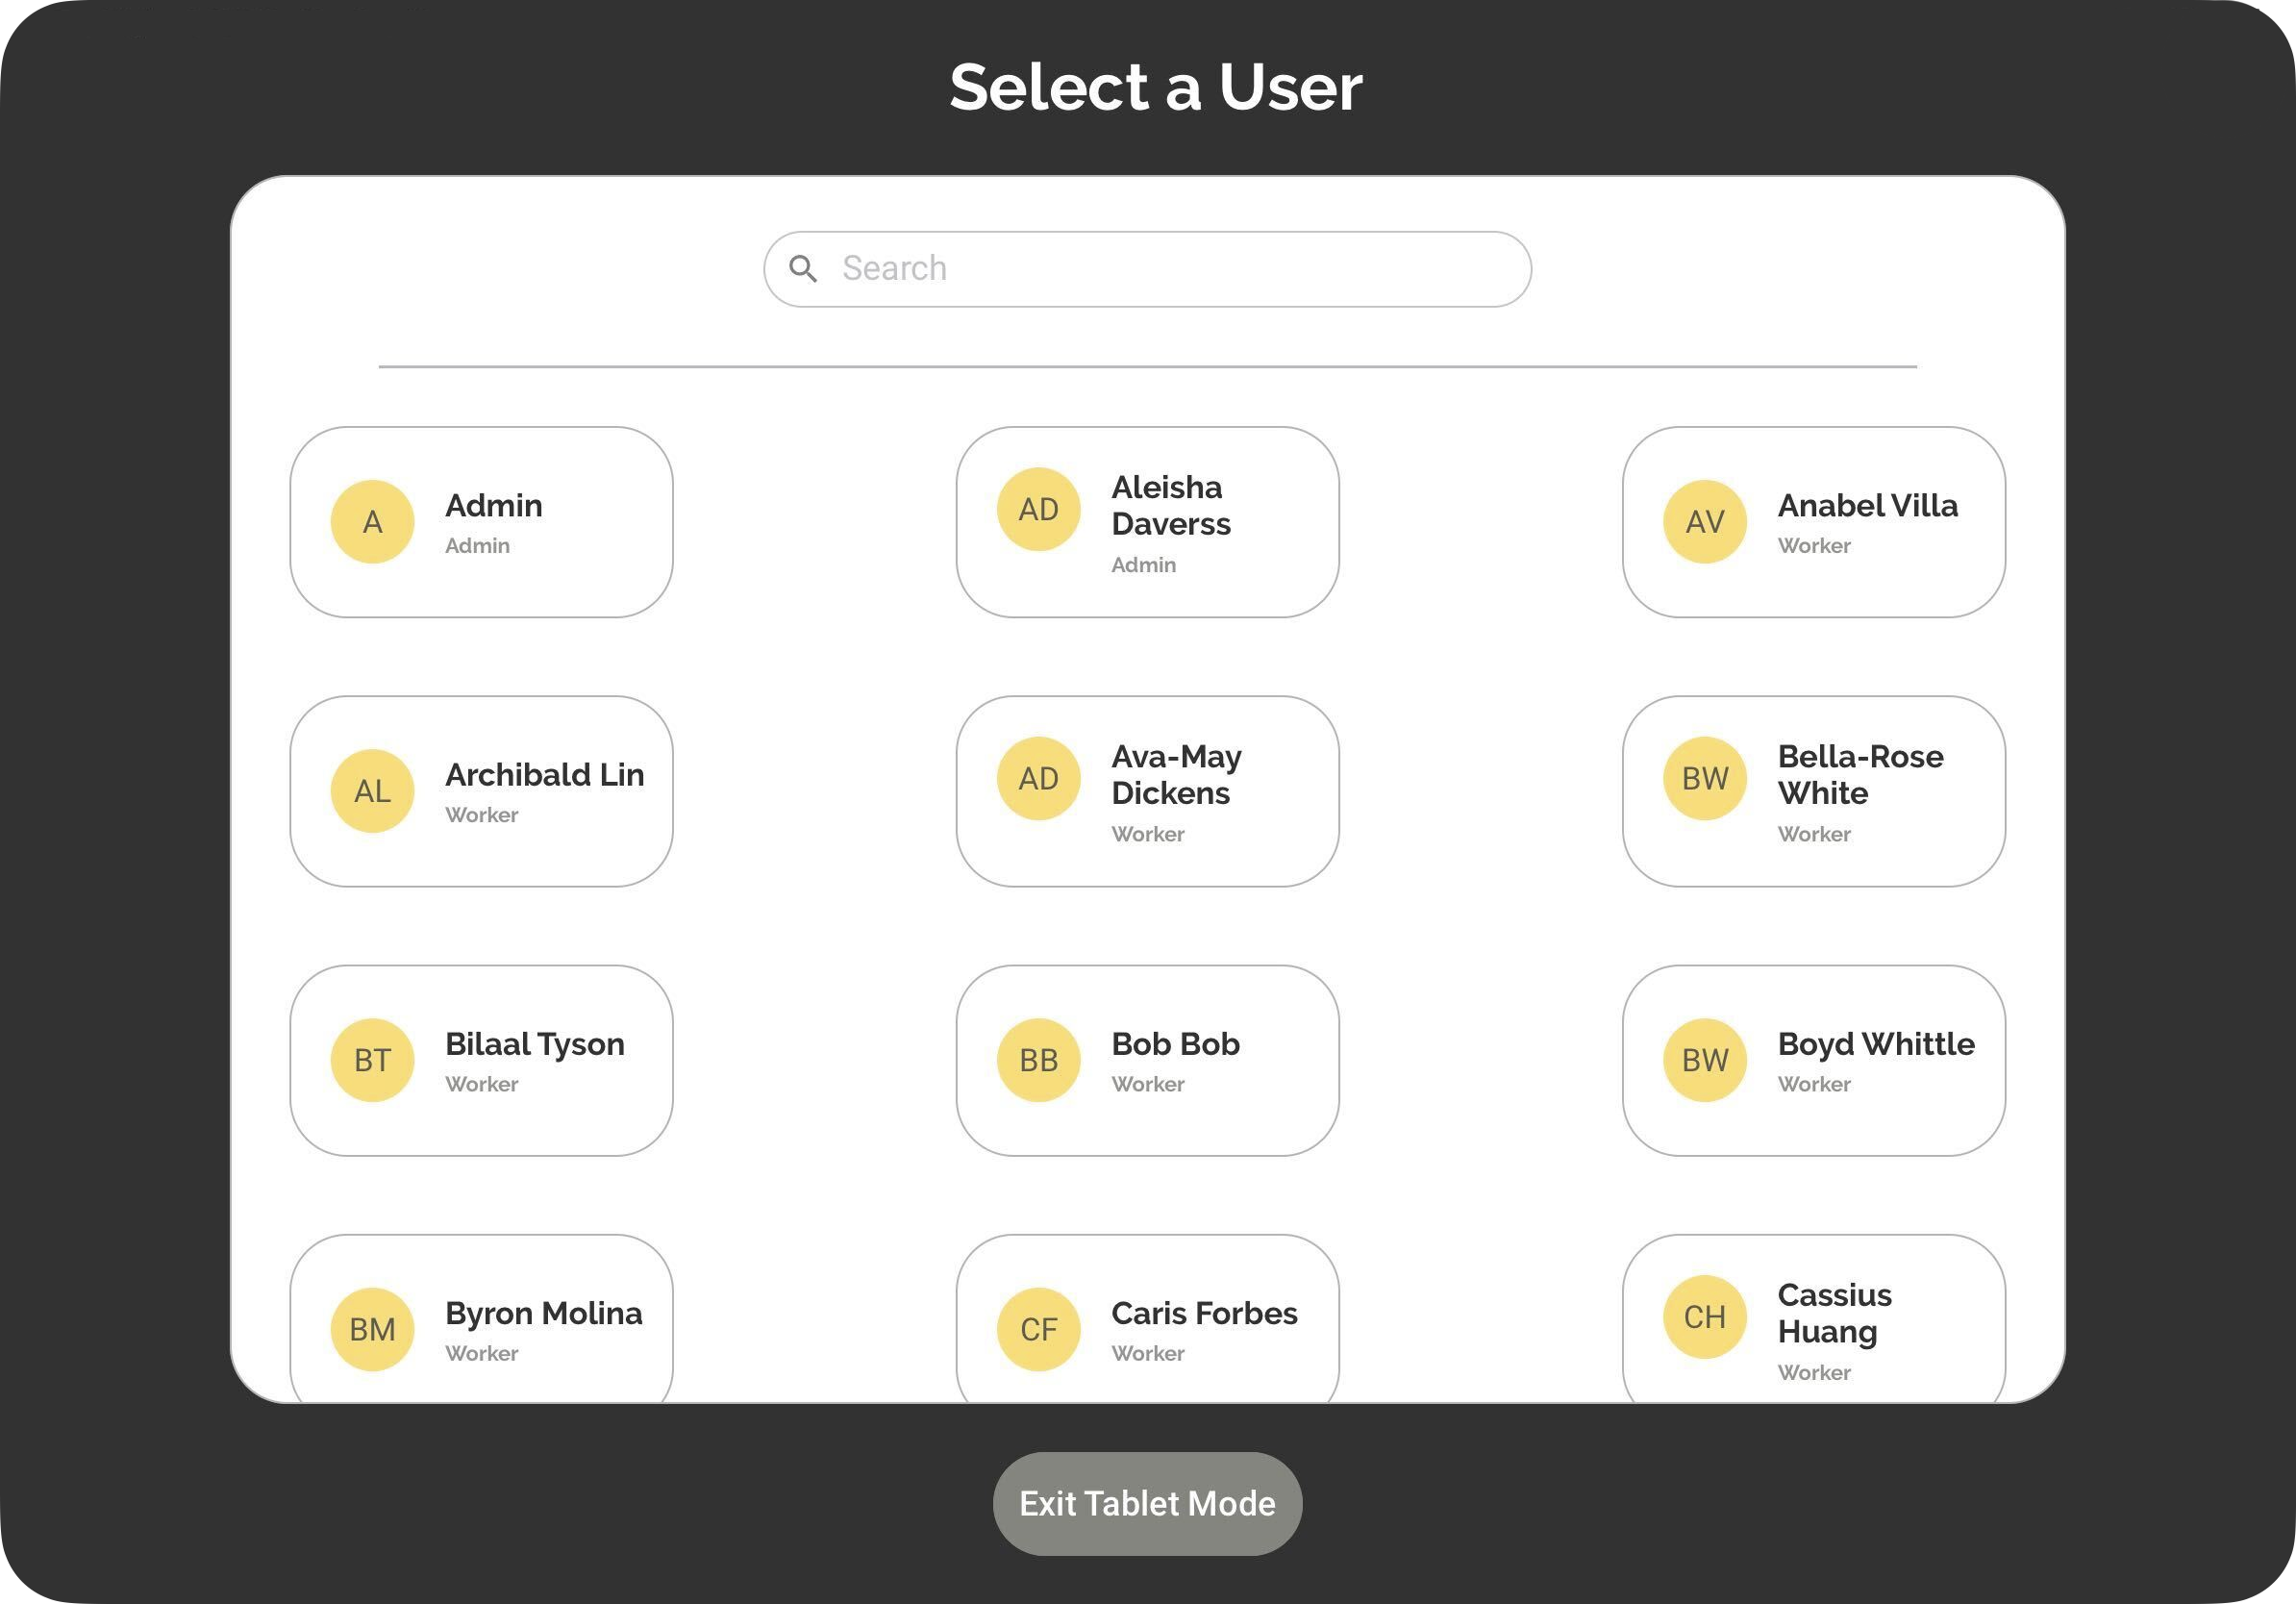
How to set up shared tablet mode
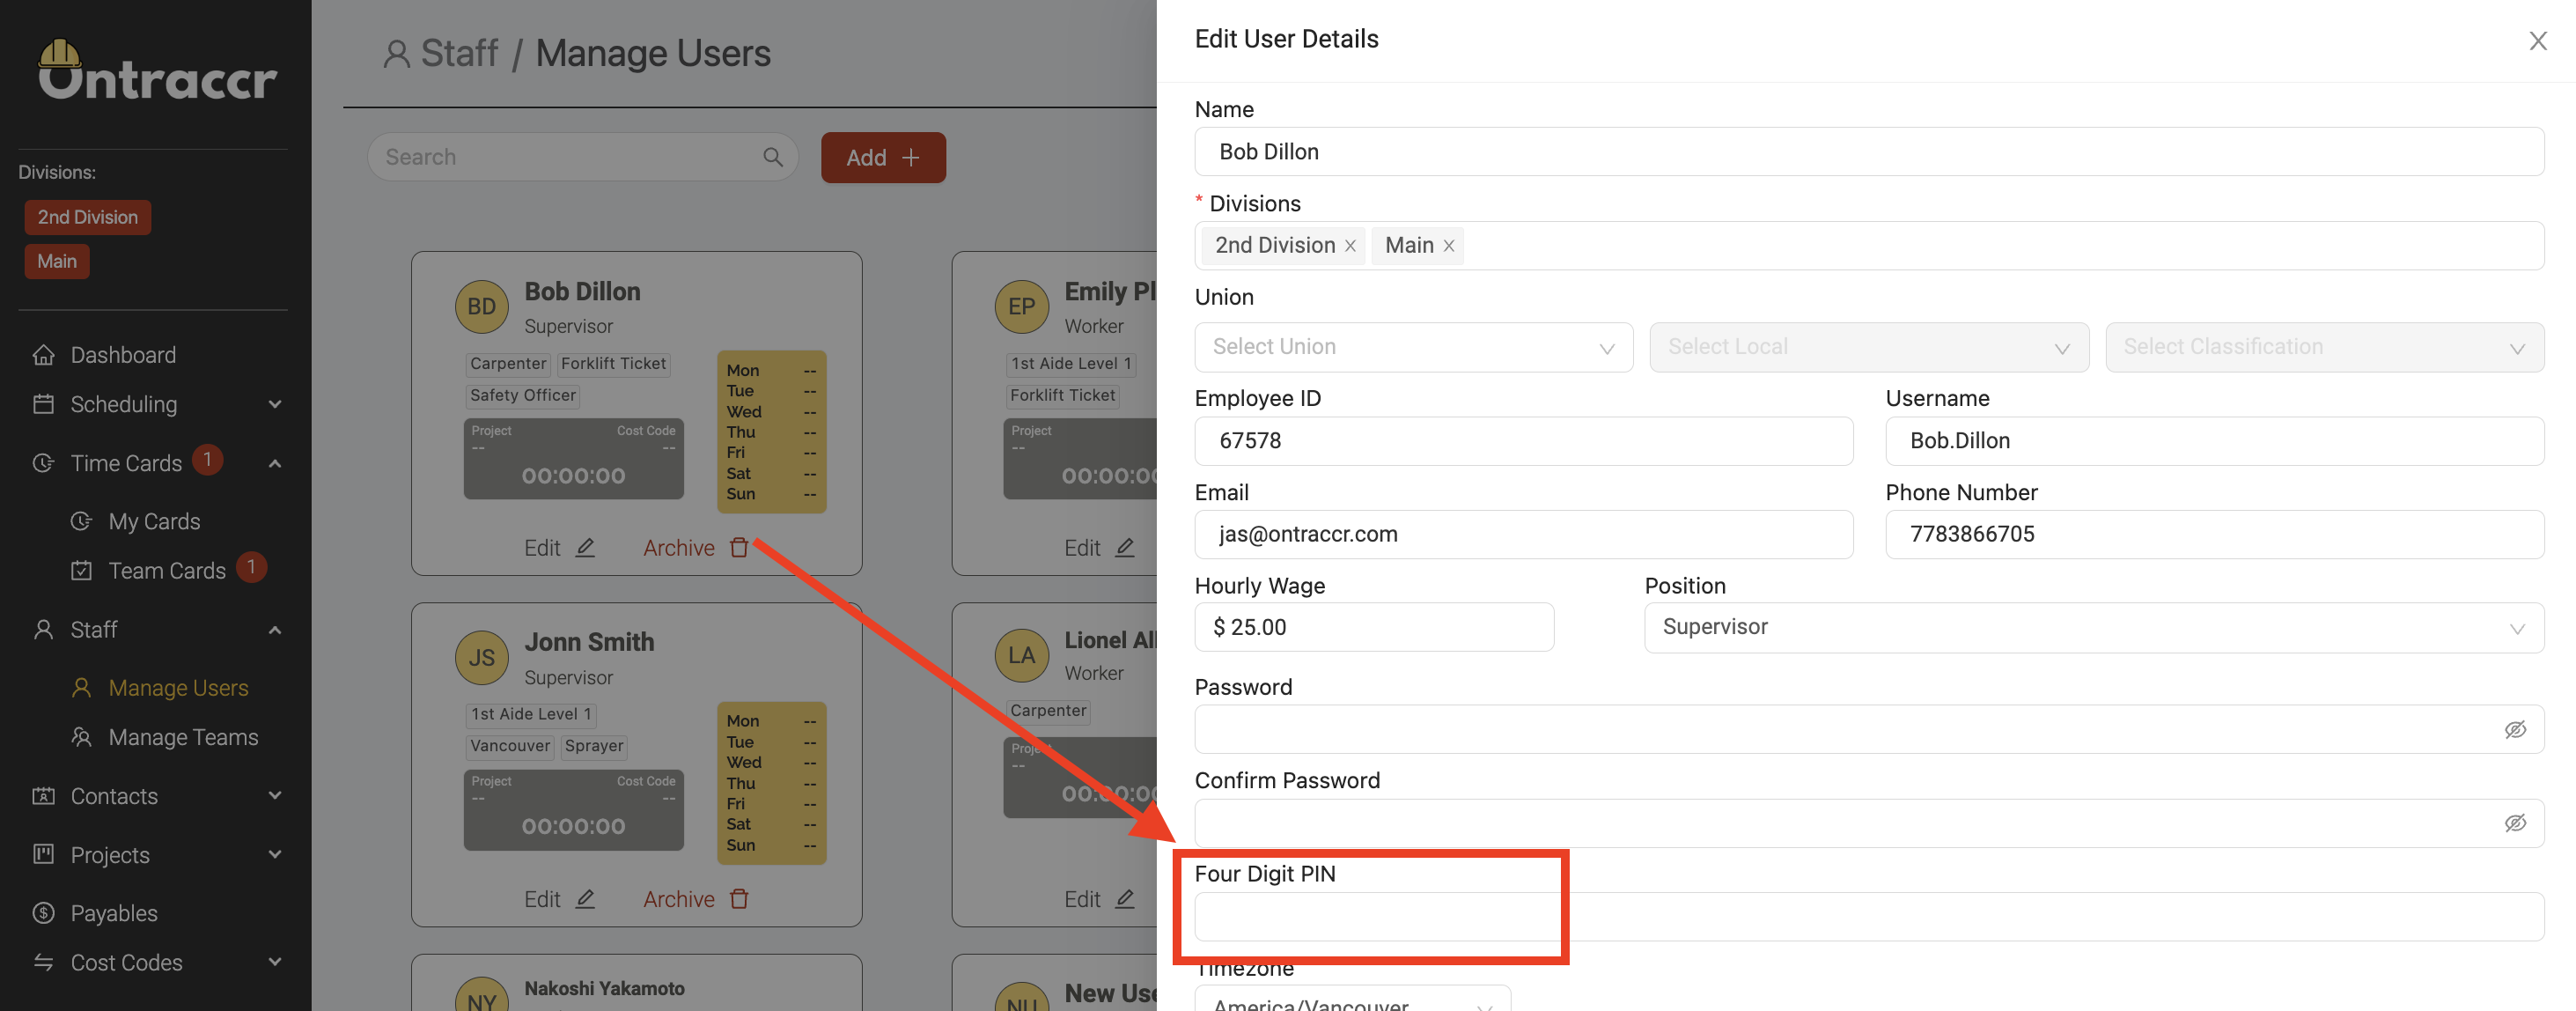
Tablet Mode is a convenient feature which allows your team to deploy field tablets on-site, where staff can punch into them much like traditional punch clocks. To use Tablet Mode, you must assign user PINs and create a tablet mode account.
Users must first be assigned a 4-digit PIN to clock in and out of the tablet. This can be done during user creation, or via the ‘Manage Users' page.
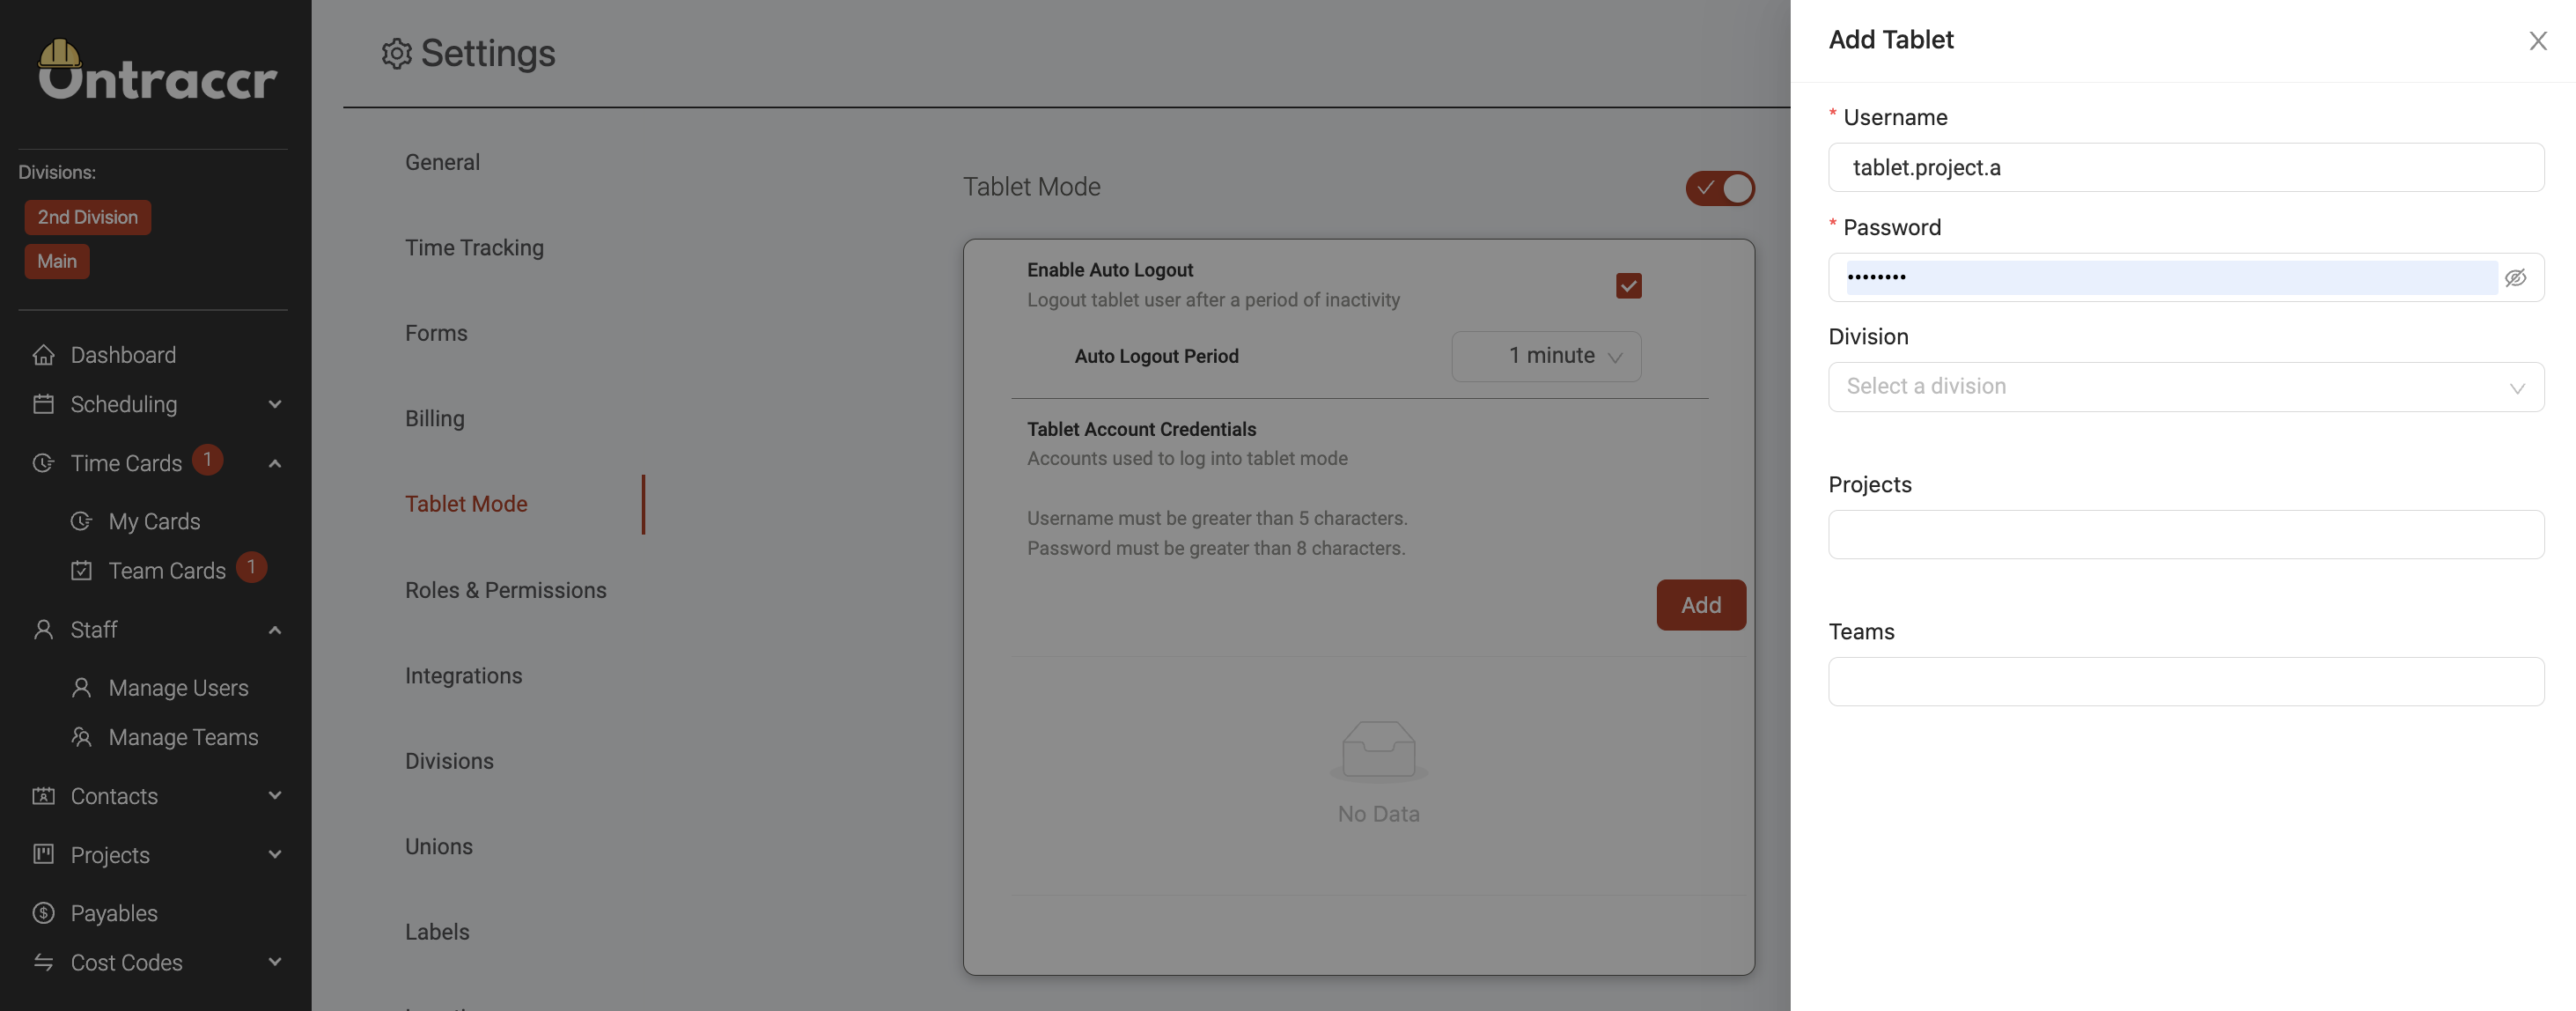
To create a Tablet Mode account, Navigate to the Settings > Tablet Mode page. Here is where you will be able to enter multiple different tablet mode accounts. For example, you can set up a special Tablet Mode account per job site or location. This account info is usually shared with the Site Supervisor and Managers. To create a Tablet Mode account, click 'Add' and give the Tablet Mode a username and password.
Once set up, to use Tablet Mode, simply open the Ontraccr mobile app on a tablet device and log in with the new tablet account details to open Tablet Mode. You will then see the user selection screen where your users can pick their names from the list and enter their assigned 4-digit PIN code to log in.